Transplanting my Scadoxus
It was coincidental that, a short while after I had taken photos of how I transplanted my Scadoxus, I received a query from Rosemary as to how Scadoxus should be planted.
Scadoxus should be transplanted in late autumn or early winter, after all the leaves have died down. Unfortunately my planning seldom coincides with reality. Half way through September I impulsively decided to move some of my Scadoxus into a new bed that I was building. I wanted them to have a really good start, considering that the bulbs were already sporting proud, green tufts of leaves. This is the way I did it:
Preparation
I prepared the area in which the bulbs were to be planted by digging the soil over just enough to break up the larger clods. This is where one should add some compost but I forgot. Scadoxus are greedy feeders and they will be left in one position for some years.
Only then did I fetch the bulbs out of the ground.
For me, this is important: If the soil is wet on planting day, wait for another day or you could end up with soil compacted into cement. I like the soil be dry enough to sift easily through my fingers but moist enough to hold its shape.
Lifting the bulbs
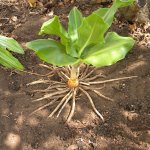
Scadoxus have a smallish bulb with long to very long, white roots about the thickness of a pencil - the same type of roots as Clivia. I lifted the plants gently from their original position, being careful not to break the roots. If I were transplanting in autumn, I would probably have cut the longer roots to a more manageable length but because of the lateness of the season I decided to keep the roots as undamaged as possible. This in the hopes of hastening their readjustment to a new environment. I did notice a bit of Mole Rat damage. Some of the bulbs had been partially eaten and others were missing many or all of their roots.
You will find that a Scadoxus that has been undisturbed for a long time will have a huge bunch of these roots. Those in the pictures shown here are young plants and have only been in the ground for a year or two.
Replanting
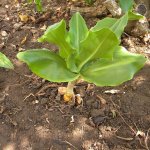
Using the flat of my hand and a circular motion, I made a large, round, saucer-shaped depression with a little hump of soil in the center. Why the hump? The experts say that this prevents an airspace below the bulb where disease or fungus could develop. I placed the bulb on the hump with the roots spread out around it, making sure that the top of the bulb would be just below ground level. I settled the bulb by gently wiggling it down onto the hump to fill up any air pockets. I covered the outer roots first, pressing them down a little into the soil. Finally I covered the all the roots with the soil left around the 'saucer' and patted the soil, gently first to settle the soil around the roots, then a firm patting down all round.
I'm sure the reason for planting in dry soil is now clear...
I won't lie. By the fifth bulb the job had become tedious and by the twelfth bulb I was working on autopilot.
Finishing off
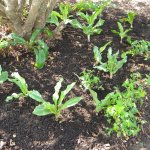
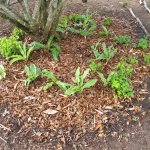
Once all the bulbs were planted, I scattered the contents of a bag of compost over the patch. I would normally not bother with compost as I rely more on mulch for feeding the soil - I just happened to find an old bag of it lying around in a dark corner. I topped the patch with a thick layer of leaves and gave it a good, gentle soaking.
Will it work?
I hope so. I am not an expert - just a gardener. For me, doing it this way just felt right. So far, so good. It is now five weeks since the transplant was done and the plants don't seem to have noticed that they have moved. The acid test will be if they flower this year. Very probably not. Scadoxus do not like to be disturbed and will usually refuse to flower the season after a transplant. I'll definitely update this blog with the results.


Comments
Success!
I'm pleased to say that more than half the Scadoxus that I replanted produced large, healthy flowers and full heads of seed. Of those that did not flower, most are young bulbs that should flower in the next or following season.
Scadoxus in UK
I am delighted to have found your page. I bought a Scadoxus about 3 years ago and she flowered. Talk about the WOW factor! Mummy then produced 2 babies that I separated and are now in a pot giving out the lovely leaves. Mummy, meanwhile, having given her all to her daughters, shrank and I thought she was going to snuff it. But she didn't (I did a lot of praying around that time)and this year she flowered. The flowerhead only about the size of a golf ball, but is producing 4 green glossy seed heads. She is in a very smell pot and currently stands under 'warm white' grow lamp on a heated tray to give her the light quality for flowering. We don't have the quality of light during certain times of the year that tropical climes do. When she's done the business, she will go out into a light unheated porch for her sleep. We are now in autumn, coming into winter. Next summer she can go out in the shade.
Scadoxus in UK
Hi Lynn
My apologies for the tardy reply.
Thanks for sharing your Scadoxus story. The flowers are indeed stunning.
In their natural habitat they usually only flower about every three years. To produce the flower takes up a great deal of stored energy from the bulb and it takes a long time to recover and produce another flower - as you saw with your shrunken bulb. I have read that one can encourage annual flowering of potted bulbs by heavy feeding with organic fertiliser. They are very greedy feeders so they need feeding in any case, as there is little nutrition left in the pot after flowering.
Kind regards
Lorraine
Scadoxux
Thanks for this Lorraine. My 'baby' is still hanging on to her seed pods, 3 of them. I have moved her from cool white to warm white to help with flowering/seed production. Will remember to feed her well next spring to help her get over motherhood.
Add new comment